<<Back to OSDM Section Home | Feature Notes Main | Forward to OSDM Feature Notes - Media >>

Table of Contents
- Main
- Display Settings
- (Vector) Stars
- Copper/Plasma/Borderline
|
|
|
Main
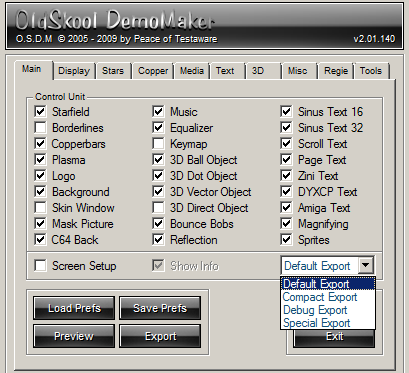
The Main Page of OSDM. Here you enable or disable the effects that you would like to use in your OSDM intro/demo (Control Unit Frame).
Important: If you did not enable an effect here, it will not be shown in your final intro executable nor preview, regardless, if you specified settings for it or even call it via the CAL command in OSDM Script.
There is also a drop down for the Export type:
- Default Export
- Compact Export - Produces smaller executables, but not all effects available in OSDM can be used for a production that is being exported that way
- Debug Export - Creates a much larger executable for debugging purposes. It also allows you to enable/disable the "Show Info" checkbox. If "Show Info" is enabled, OSDM shows on top of the screen technical details of the production while it is running, like Intro Time, Sub Procedure executed (OSDM Script), Coordinates, NOP counts and others.
- Special Export
Options
- Screen Setup: On/Off - If you want to allow users to specify the screen resolution and if they prefer to run your production in Windowed mode rather than Full Screen, enable this option. Note: you also have to configure the Display settings for your intro accordingly.
Basic OSDM Functions
- Load Prefs - Load the settings of an OSDM intro/demo production in .INI text format
- Save Prefs - Save the current settings in .INI format
- Export - Create an Executable based on the various intro and export settings
- Preview - Creates and then executes a temporary executable. The shortcut for this is "F5" and is usefull to review your progress during the intro/demo designing
- Exit - Quit the OSDM Interface
- About - A little pop-up window to pay tribute to the developers of OSDM
Display Settings
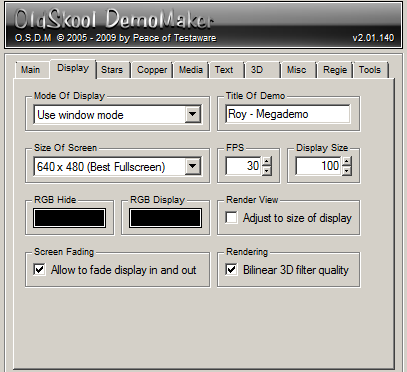
- Mode of Display
- Use Window Mode
- Use Full Screen Mode
- Use Full Desktop Mode - Almost like Window Mode, but Window size spans the whole desktop
- Title of Demo - Title used for Window and/or Process Name
- Size Of Screen
- Best Resolution - OSDM determines the best resolution automatically
- 640x480 (Best Full Screen)
-
... List with various possible resolutions, which depends on the resolutions supported by the current graphics cards.
- FPS - Frame Rate (Note: The Frame Rate setting has direct impact on any "Speed" or "Delay" settings of all active effects, so you should decide on this setting as early as possible. Rule of thumb: the higher the frame rate, the smoother the effects (in most cases), but also the higher the resources usage and power requirements. Depending on the type of production, I recommend to choose between the frame rates: 15, 30 and 60.
- Display Size (in percent) = 1-100, leave it at 100 unless you are going to use either a "Border Line" or "Misc\Skin Window" Effect.
- RGB Hide - RGB Color - The color that will be treated as "transparent" for most of the images that you are using in your production (default is "black", RGB: 0,0,0)
- RGB Display - RGB Color
- Render View - Adjust Display - On/Off
- Screen Fading - Fade Display In and Out - On/Off
- Rendering - Bilinear 3D Filtering - On/Off
Vector Stars
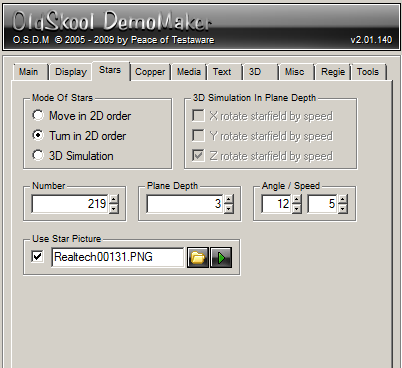
- Modes
- Move in 2D Order
- Turn in 2D Order
- 3D Simulation
- X-Rotate Starfield - On/Off
- Y-Rotate Starfield - On/Off
- Z-Rotate Starfield - On/Off
- Number of Stars = 1-XXXXX
- Plane Depth = 1-10 (number of "layers" the specified number of stars is spread over)
- Angle (Tilt) = Off, 1-360
- Speed = Off, 1-90
- Use Picture - On/Off
- Image File - Maximum Size is 10 KB
Copper Effects
Several Effects of OSDM support what is called a "Copper Effect". Although the traditional Copper Effect is based on the manipulation of the palette in the display memory of the computer, the same effect is emulated by OSDM by using a pre-defined image with the desired color cycling effect instead.
Copper Media
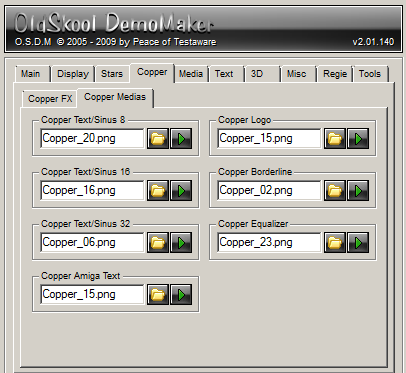
Effects Supporting Copper Effect
- Sinus Scroll 16
- Sinus Scroll 32
- Scroll Text 8
- Scroll Text 16
- Scroll Text 32
- Amiga Text
- Logo
- Border Line
- Equalizer
Copper Bars/Plasma & Border Line Effects
The Copper FX tab controls 3 individual effects, which must each be enabled specifically in the "Main" tab.
- Borderlines
- Copperbars
- Plasma
Copper Bars

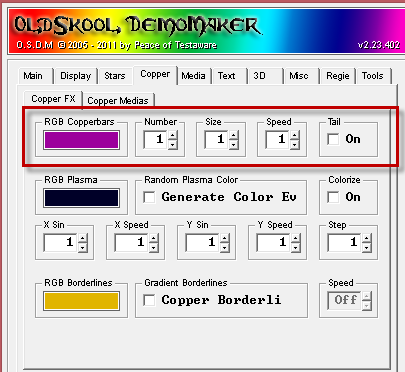
- Color - RGB Color
- Number - 1-16
- Size - 1-256
- Speed - 1-10
- Tail - On/Off
Color Plasma

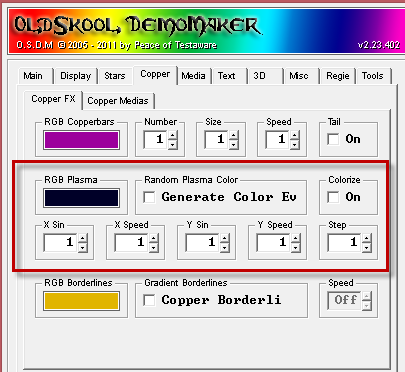
- Color - RGB Color
- Random - Generate Colore - On/Off
- Colorize - On/Off
- X-Sin - 1-360
- X-Speed - 1-10
- Y-Sin - 1-360
- Y-Speed - 1-10
- Step - 1-10
Copper Border Line
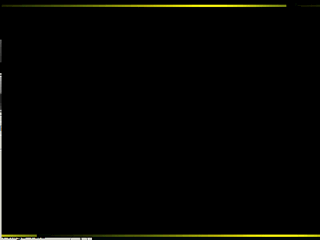
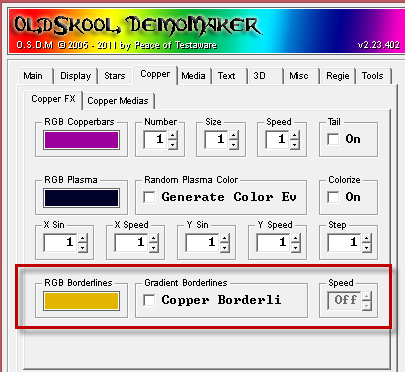
- Color - RGB
- Gradient/Copper Border Lines - On/Off
Its recommended to reduce the "Display Size" in the "Display" Tab from 100 to lets say 90-98 to make the border line effect visible properly
<<Back to OSDM Section Home | Feature Notes Main | Forward to OSDM Feature Notes - Media >>
|