Table of Contents3D<<Back to OSDM Feature Notes - Text | Feature Notes Home | Forward to OSDM Feature Notes - Misc >> 3D Ball
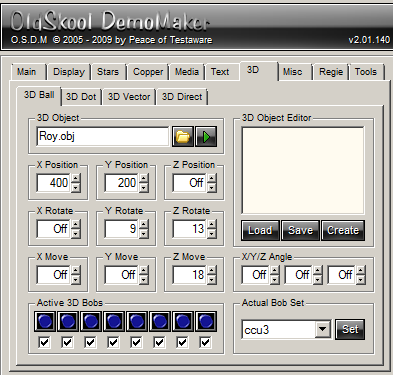
OBJ 3D Ball definitions are by default simple text documents that can be edited with any text editor like Notepad. See the structure of such VOBJ file further down below. If the OBJ definition file grows too large, OSDM becomes unable to load it. But there exists a workaround solution for this problem. 3D Ball Settings
OBJ File Packing and UnpackingUnder "Tools\Utils" and then Frame "File Tools" exists the feature to "PACK" and "DEPACK". This feature works for several things in OSDM, including for 3D Ball OBJ files. If you pack a text format 3D Ball object file, it will be converted to binary format and is much smaller in size (80% or more smaller). You cannot edit such packed OBJ files with a text editor anymore, but OSDM can load them. You can also DEPACK them (unpack) at any time, if you need to make changes to any of them. Multiple 3D Ball Objects in One DemoAt the same location under "Tools\Utils" where you can pack und unpack OBJ files exists also the option "Create Multiple 3D BallObject". If you select that and then click the little black "play" button to the left a pop-up opens with a grid for IDN, File and Size and the options to Add OBJ, Remove it and a "Create" button. You use the Add and Remove buttons to create a list of 3D Ball objects that you would like to use in your demo. When done, click on "Create" and you will be asked to save the new collection in a new file with the extension ".mOBJ". This mOBJ file can be selected as a 3D Object, just like your regular OBJ files, however, you loose the ability to preview your 3D Ball objects. It also requires the use of the OSDM "Script Feature" (under "Regie\Script") to make use of the multiple 3D Ball objects. The individual 3D Ball objects within the mOBJ collection can be activated via the IDN command in OSDM Script. For example: CAL = 3DBALL ;Start 3DBall Effect* (*must be enabled on MAIN screen) LEA = 3DBALL ;Activate 3DBall Effect for Script Control IDN = 0 ;Activates the first 3DBall Object in your mOBJ file ... Note: "Include Script and sort effects by Storyboard only" Checkbox must be enabled under "Regie\Script" in order to execute it. .OBJ File Definition
Commands
AnimPoint - The number of the 3D Ball to animate, or more precise the ID of the Data point, meaning the X'th DATA X, Y, Z, BALL, SIZE, ALPHA statement in the OBJ file, starting with 0 for the first DATA statement. Sinus Size - distance from original coordinate, can be a positive or negative number depending on the direction of the target point from the source. Sinus Add - how much to add to each step along the way. The speed for the calculation of the sinus. Tip: to synchronize animations with different Sinus Sizes, make sure to specify a value for Sinus Add, that the result of Sinus Size / Sinus Add is the same for each of the animation definitions. Example:
    Sz   Add
P1: 144   12  = 12
P2: 168   14  = 12
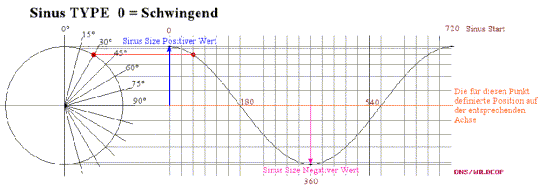
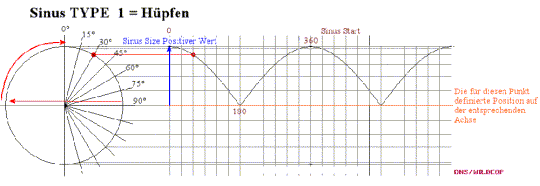
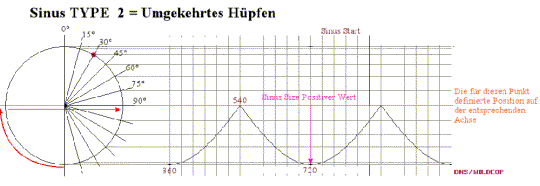
Sinus Start - Start Position in the Sinus Table ( 0 - 720 ) Type - Type=0 means "Swing" (default), meaning the speed of the object is the fastest half way and slowest at the start and at the end, Type=1 means "Jump", meaning same speed at the beginning, slowing down towards the end, Type=2 is like "Jump", but reversed. It starts slow and gets faster without slowing down before it reaches the end.
Example: Atom by Synth FX=3DBobs Name=Atom by Synth Data32,,,,42, Data,32,,6,42, Data,,32,6,42, Data-32,,,6,42, Data,-32,,,42, Data,,-32,,42, Data,,,1,32, Data,,,1,32, Data,,,2,32, Data,,,2,32, Data,,,3,32, Data,,,3,32, AnimZ6,128,5,, AnimX6,128,6,, AnimZ7,128,5,360, AnimX7,128,6,360, AnimY8,192,6,, AnimZ8,192,7,, AnimY9,192,6,360, AnimZ9,192,7,360, AnimY10,256,7,, AnimX10,256,8,, AnimY11,256,7,360, AnimX11,256,8,360, .RAW Object FilesOSDM provides the feature to easily create single "layered" or "leveled" 3DBall Objects. You can use the build-in 3D Object Editor for example. You can also save and load those simple "2-dimentional" object definitions to make changes to them. The RAW Object File has the following struture
If you want to use the object in OSDM for your demo, you need first to convert the RAW 3DBall definition to OBJ. The build-in editor provides the option to make this conversion via the "Create" button. The OSDM.RAW example file would be converted to a OSDM.OBJ file that looks like this: FX = 3DBobs Name = OSDM Data -640, -128, 0, 1, 40, 0 Data -576, -128, 0, 1, 40, 0 Data -512, -128, 0, 1, 40, 0 Data -256, -128, 0, 2, 40, 0 Data -192, -128, 0, 2, 40, 0 Data -128, -128, 0, 2, 40, 0 Data -64, -128, 0, 2, 40, 0 Data 64, -128, 0, 0, 40, 0 Data 128, -128, 0, 0, 40, 0 Data 192, -128, 0, 0, 40, 0 Data 256, -128, 0, 0, 40, 0 Data 448, -128, 0, 5, 40, 0 Data 704, -128, 0, 5, 40, 0 Data -704, -64, 0, 1, 40, 0 Data -448, -64, 0, 1, 40, 0 Data -320, -64, 0, 2, 40, 0 Data 64, -64, 0, 0, 40, 0 Data 320, -64, 0, 0, 40, 0 Data 448, -64, 0, 5, 40, 0 Data 512, -64, 0, 5, 40, 0 Data 640, -64, 0, 5, 40, 0 Data 704, -64, 0, 5, 40, 0 Data -704, 0, 0, 1, 40, 0 Data -576, 0, 0, 4, 40, 0 Data -448, 0, 0, 1, 40, 0 Data -320, 0, 0, 2, 40, 0 Data -256, 0, 0, 2, 40, 0 Data -192, 0, 0, 2, 40, 0 Data -128, 0, 0, 2, 40, 0 Data 64, 0, 0, 0, 40, 0 Data 320, 0, 0, 0, 40, 0 Data 448, 0, 0, 5, 40, 0 Data 576, 0, 0, 5, 40, 0 Data 704, 0, 0, 5, 40, 0 Data -704, 64, 0, 1, 40, 0 Data -448, 64, 0, 1, 40, 0 Data -64, 64, 0, 2, 40, 0 Data 64, 64, 0, 0, 40, 0 Data 320, 64, 0, 0, 40, 0 Data 448, 64, 0, 5, 40, 0 Data 704, 64, 0, 5, 40, 0 Data -640, 128, 0, 1, 40, 0 Data -576, 128, 0, 1, 40, 0 Data -512, 128, 0, 1, 40, 0 Data -320, 128, 0, 2, 40, 0 Data -256, 128, 0, 2, 40, 0 Data -192, 128, 0, 2, 40, 0 Data -128, 128, 0, 2, 40, 0 Data 64, 128, 0, 0, 40, 0 Data 128, 128, 0, 0, 40, 0 Data 192, 128, 0, 0, 40, 0 Data 256, 128, 0, 0, 40, 0 Data 448, 128, 0, 5, 40, 0 Data 704, 128, 0, 5, 40, 0 As you notice, all 3D Bobs are by default placed in a distance of 64 pixels to each other, are completely opaque and of size "40". You could change that manually in the created OBJ file, if you feel comfortable doing so. .mOBJ Multi-Object File FormatThe .mOBJ file format is idential to the .mVOBJ file format for multiple 3D Vector Objects. 3D Dot
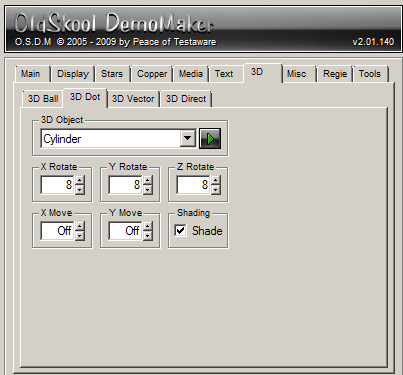
3D Dot Objects
Rotate
Move
Shade: ON/OFF - If On, DOTs further in the back will be rendered gray instead of white to enhance the depth perception for the 3D object. Notes:
3D Vector
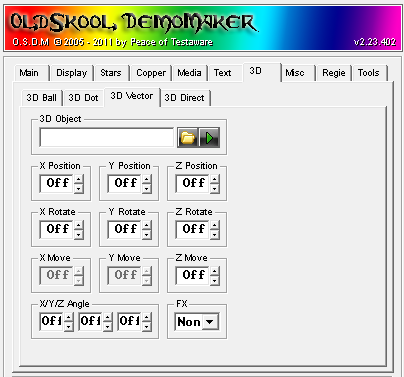
VOBJ Vector definitions are by default simple text documents that can be edited with any text editor like Notepad. See the structure of such VOBJ file further down below. If the VOBJ definition file grows too large, OSDM becomes unable to load it. But there exists a workaround solution for this problem by "packing" a 3D Vector object definition file (see details below). However, even with that is the size and complexity of vector objects limited. The current version of OSDM is only capable of rendering 3D Objects with less than 1200 Data Points and less than 2400 Polygons. 3D Vector Settings
FX
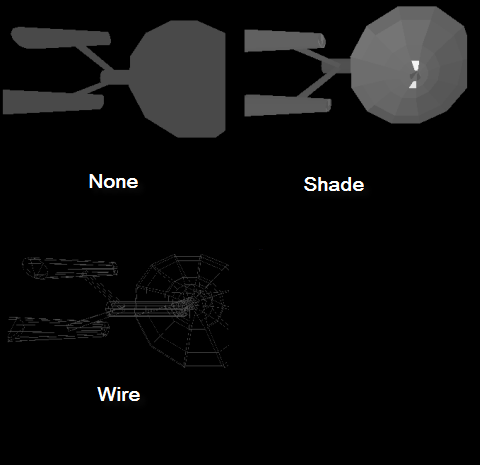
Vector Shading OptionsIn the settings screen there are two checkboxes, which determine how a vector object is rendered. Here is an illustration of how an object is rendered with the Shade selected, None and Wireframe.
Note: The "Shadow" value in the 3D Vector object definition only has impact on how the rendered object looks like, if "Shade" or "Blend" is selected. VOBJ File Packing and UnpackingUnder "Tools\Utils" and then Frame "File Tools" exists the feature to "PACK" and "DEPACK". This feature works for several things in OSDM, including for VOBJ files. If you pack a text format vector object file, it will be converted to binary format and is much smaller in size (80% or more smaller). You cannot edit such packed VOBJ files with a text editor anymore, but OSDM can load them. You can also DEPACK them (unpack) at any time, if you need to make changes to any of them. Multiple VOBJ Objects in One DemoAt the same location under "Tools\Utils" where you can pack und unpack VOBJ files exists also the option "Create Multiple 3D VectorObject". If you select that and then click the little black "play" button to the left a pop-up opens with a grid for IDN, File and Size and the options to Add VOBJ, Remove it and a "Create" button. You use the "Add" and "Remove" buttons to create a list of vector objects that you would like to use in your demo. When done, click on "Create" and you will be asked to save the new collection in a new file with the extension ".mVOBJ". This mVOBJ file can be selected as a 3D Object, just like your regular VOBJ files, however, you loose the ability to preview your vectors. It also requires the use of the OSDM "Script Feature" (under "Regie\Script") to make use of the multiple vector objects. The individual vector objects within the mVOBJ collection can be activated via the IDN command in OSDM Script. For example: CAL = 3DVECTOR ;Start 3D Vector Effect* (*must be enabled on MAIN screen) LEA = 3DVECTOR ;Activate 3DVector Effect for Script Control IDN = 0 ;Activates the first Vector Object in your mVOBJ file ... Note: "Include Script and sort effects by Storyboard only" Checkbox must be enabled under "Regie\Script" in order to execute it. The format of a mVOBJ multi-object file is explained further down below. .VOBJ File Definition
Definition Summaries
Commands
Example: Glenz Cube Animated by Genom
FX = Vector
Name = genoms Glenz cube raw wobbler the 6th.
Colors = 4
Points = 14
Surfaces =24
Color 1, 64,64,64 ; Color 1
Color 2, 127, 127,127 ; Color 2
Color 3,192,192,192
Color 4,255,255,255
Data -250, -250, -250 ; Eckpunkt 0
Data 150, -250, -350 ; Eckpunkt 1
Data 250, 250, -250 ; Eckpunkt 2
Data -250, 250, -350 ; Eckpunkt 3
Data -230, -230, 130 ; Eckpunkt 4
Data 130, -230, 230 ; Eckpunkt 5
Data 230, 230, 130 ; Eckpunkt 6
Data -230, 230, 230 ; Eckpunkt 7
Data 0, 0, -310 ; Mitte Flõche 1
Data 0, 0, 310 ; Mitte Flõche 2
Data -320, 0, 0 ; Mitte Flõche 3
Data 320, 0, 0 ; Mitte Flõche 4
Data 0, -340, 0 ; Mitte Flõche 5
Data 0, 340, 0 ; Mitte Flõche 6
Poly 0,1,8,8,1,212,1 ; Oben
Poly 2,3,8,8,1,212,1
Poly 2,1,8,8,2,212,1
Poly 0,3,8,8,2,212,1
Poly 4,5,9,9,1,212,2 ; Unten
Poly 6,7,9,9,1,212,2
Poly 6,5,9,9,2,212,2
Poly 4,7,9,9,2,212,2
Poly 0,4,10,10,3,212,1 ; Rechts
Poly 3,7,10,10,3,212,1
Poly 0,3,10,10,1,212,1
Poly 7,4,10,10,1,212,1
Poly 1,5,11,11,3,212,2; Links
Poly 2,6,11,11,3,212,2
Poly 1,2,11,11,1,212,2
Poly 5,6,11,11,1,212,2
Poly 0,1,12,12,4,212,1; Hinten
Poly 4,5,12,12,4,212,1
Poly 0,4,12,12,1,212,1
Poly 1,5,12,12,1,212,1
Poly 3,2,13,13,4,212,2; Vorne
Poly 7,6,13,13,4,212,2
Poly 3,7,13,13,1,212,2
Poly 2,6,13,13,1,212,2
Animx 0, 90,22, 99,6
Animx 1, 90,22, 199, 6
Animx 2, 60,22, 99,6
Animx 3, 30,22, 199, 6
Animx 4, 30,22, 99,6
Animx 5, 60,22, 199, 6
Animx 6, 60,22, 99,6
Animx 7, 90,22, 199, 6
Animx 8, 90,22, 99,6
Animx 9, 60,22, 199, 6
Animx 10, 30,22, 99,6
Animx 11, 30,22, 199, 6
Animx 12, 60,22, 99,6
Animx 13, 60,22, 199, 6
AnimY 0, 60,8, 99, 9
AnimY 1, -60,8, -99, 9
AnimY 2, 60,8, -66, 9
AnimY 3, -60,8, 66, 9
AnimY 4, 60,8, 133, 9
AnimY 5, -60,8, 133, 9
AnimY 6, 60,8, -99, 9
AnimY 7, -60,8, 99, 9
AnimY 8, 60,8, 66, 9
AnimY 9, -60,8, -66, 9
AnimY 10, 60,8, 133, 9
AnimY 11, -60,8, 133, 9
AnimY 12, 60,8, -99, 9
AnimY 13, -60,8, 99, 9
Animz 0, 90,8, 199, 8
Animz 1, 90,8, 139, 8
Animz 2, 60,8, 199, 8
Animz 3, 60,8, -69, 8
Animz 4, 90,8, -199, 8
Animz 5, 90,8, 99, 8
Animz 6, 60,8, 199, 8
Animz 7, 60,8, 139, 8
Animz 8, 90,8, 199, 8
Animz 9, 90,8, -69, 8
Animz 10, 60,8, -199, 8
Animz 11, 60,8, 99, 8
Animz 12, 90,8, 199, 8
Animz 13, 90,8, 139, 8
Animation TypesIllustrations of the "Type" parameter for the AnimX, AnimY and AnimZ commands.
.mVOBJ File DefinitionA mVOBJ File is simply a collection of Unpacked or Packed VOBJ Files joined together. In order for OSDM to be able to split the multiple VOBJ file apart to make each VOBJ available in the production via IDN numbers 0-X, the length of each VOBJ file is included in the mVOBJ file. The lenght is the VOBJ file size in bytes and it is stored in long-int format (4 bytes in length). For Example, if you have the following 3 VOBJ files Object Size in Bytes Size in Long-Int (HEX) VOBJ1.VOBJ 1,343 3F 05 00 00 VOBJ2.VOBJ 6,800 90 1A 00 00 VOBJ3.VOBJ 15,899 1B 3E 00 00 The mVOBJ file would be structured like this 3F 05 00 00 + VOBJ1.VOBJ + 90 1A 00 00 + VOBJ2.VOBJ + 1B 3E 00 00 + VOBJ3.VOBJwhere "VOBJ1 - VOBJ3.VOBJ" stands for the content of each VOBJ file of course. 3D Direct
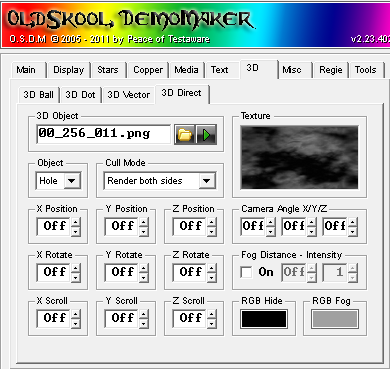
(under construction)
<<Back to OSDM Feature Notes - Text | Feature Notes Home | Forward to OSDM Feature Notes - Misc >> |
|


|